Journey to the Center of Web 3D
Web 3D is finally taking off, thanks to new code libraries and cooperation from browser makers. Here’s a look at its current state as seen in my experiments with three.js, a popular web 3D library.
I recently wrote at some length about mountains. My thoughts were punctuated with some 3D demos, viewable in certain modern web browsers. I’d like to thank you for reading this far, so here’s a 3D animated gif of a llama:
(Try the 3D llama gif demo. Or, view the original llama gif, for comparison.)
As if that weren’t enough, I’d now like to explain the rationale behind the mountain demos, and then describe their construction for anyone who’d like to know why they were interesting, how I built them, or why I’d go to the trouble. (I’ll start high-level and get increasingly detailed.)
First, the rationale: At the moment, the web (and most of our computing experience) is presented in two boring dimensions. In general, we’ve adapted what we knew about static two-dimensional design to explore the capabilities of a dynamic, interactive screen. Adding a third dimension to this problem greatly increases the complexity of design and implementation, and has typically been more trouble than it’s worth. (I’ve spent most of my professional life as a 3D animator, communicating with audiences the old, slow, non-interactive way.)
Many of our 2D interfaces have borrowed effects or basic functionality from the third dimension: overlapping windows, transparency, reflections, and our beloved drop shadows and bevels all suggest depth, which generally serves to reinforce figure-ground relationships in an often-cramped display area. Modern web design techniques also include the ability to perform “3D transformations” on 2D elements – spinning, tilting, and so on – and for that I applaud them.
But there’s a world of ideas which could be more easily communicated or manipulated in true interactive 3D. We haven’t explored that conceptual landscape on the web much because it’s been prohibitively difficult; the tech just hasn’t been there.
Hwæt! The tech is approaching – web 3D is going mainstream. As processors and graphics cards become more capable, code libraries and APIs are making the process easier, and more browsers are including built-in support. (As of this writing, the last few versions of Chrome and Firefox support WebGL by default, Safari has it as an option which can be enabled, and IE has promised to look into it.) In response, 3D software makers are moving online, notably Autodesk – makers of AutoCAD, Maya, and 3ds Max – which has begun to release browser-based applications using the same technology I used for my demos.
So far – apart from a few applications explicitly focused on the production and manipulation of 3D objects – web 3D has been mostly a novelty, restricted to games and demos. I doubt we’ll see full-3D interfaces in general use anytime soon, which is probably for the best. However, 3D in-browser applications and 3D elements in web pages will be an increasingly common phenomenon as we learn how to use them without hurting ourselves or others.
So much for the rationale – now for a fascinating technical overview.
Three.js is a JavaScript library which allows easier control of the chips on graphics cards known as GPUs. This is particularly interesting because GPUs are interesting: they’re specialized processors, developed to relieve CPUs of the burden of graphics calculations. In the old days, the CPU not only handled computing tasks, but also did all the work of sending pixels to the screen, which turned out to be increasingly inefficient as graphics became more complex. With a separate, specialized GPU, you can run certain kinds of code much, much faster than otherwise. The trouble with GPUs is that, being newer and more specialized than CPUs, they’ve been the domain of specialists. This is where three.js comes in.
Like any code library, three.js is a set of shortcuts. In this case, the shortcuts are to WebGL code, which is itself a shortcut to the binary language of moisture vaporators, by which I mean GPUs. For us, that means three.js an easy, speedy way to do a lot of very surprisingly cool stuff with pixels. Of course, if you want to move beyond the default settings, you have to know something about how the library is put together.
This brings us to the major downside of three.js: so far, its documentation is pretty meagre. Still, it’s one of the easier 3D libraries to learn; it’s open-source, and free; the number of demos and examples is increasing daily; and it explicitly describes its target audience as “dummies” which makes me feel it has my best interests in mind. There may yet appear an easier, more powerful challenger, but the underlying principles will be the same.
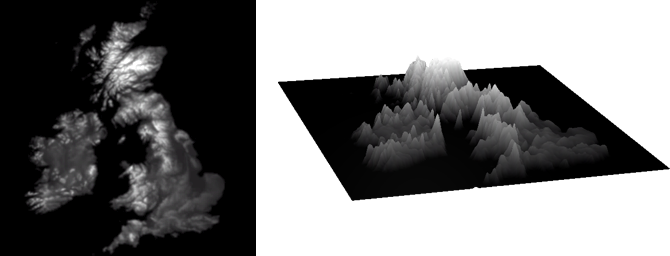
So about those demos. They show various ways to use three.js to manipulate elevation data, in the form of heightmaps: images which depict the height of terrain, in this case as scanned by the Space Shuttle. I wanted to turn these 2D representations of 3D information back into a 3D representation of mountains, in part because I have a thing for raised-relief maps, and in part because I wanted to try something that could feasibly be a real-world application, achievable by an individual, using readily-available tools.
This started with a heightmap, which I used to deform a plane, the same way Google Earth does it. The 3D term for this kind of transformation is “displacement.” This process takes a base mesh of vertices, and then “displaces” the vertices – pushes or pulls them – by some amount, depending on a control texture. Three.js includes this capability by default in certain circumstances, and when used in the way three.js intended, I was able to use a displacement map with no custom code.
However, I wanted more control over the look of my mountains. Other common features of 3D lighting – such as normal mapping and specular highlights – are included in three.js, but only in certain other circumstances.
From the point of view of a 3D professional, three.js is limited by its shaders. Shaders are sets of rules for determining the appearance of 3D objects, including color, shininess, transparency, texture, and more. Almost all shaders include basic features such as color. Other features – like displacement or specular highlights – are only available in certain specialized shaders. As it happened, a single shader with all the features I wanted for my demos didn’t exist. So I had to dissect existing three.js shaders and cobble together custom shaders to get the combination of features that I wanted.
Additionally, some of the three.js shaders were written in ways that made them incompatible with others; though they shared features such as basic color shading, these features were implemented in slightly different ways. Combining them was a bit like trying to take the engine out of one car and put it into another: different engines achieve the same result, but through different means, and in different circumstances. At best, some new fittings are necessary; at worst, you’re looking at a complete overhaul, buddy.
To complicate matters still further, three.js is in continuous development. Many demos and examples I found were out of date when I tried to replicate them, and didn’t run with the latest version of the library. Everything I describe below is contingent on a particular version of three.js (r.58), which may become obsolete as the project continues to evolve.
So let’s take a look at a shader. Here is a sphere with three different shaders applied:
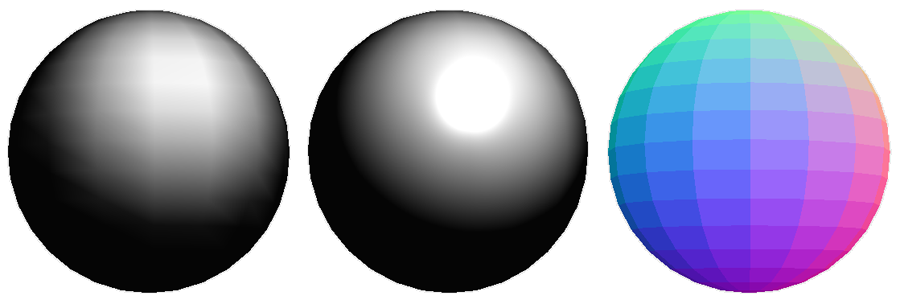
(Left to right: a Lambert shader; a Phong shader, including a specular highlight; a “normal” shader, which colors each face based on its angle relative to the camera. Try the shaders demo.)
To a user, shaders are sets of instructions for defining the look of a 3D object. To a GPU, a shader is a program which is run once per pixel, often for many pixels at a time simultaneously. In the OpenGL shading language, there are two primary types of shaders: a “vertex” shader, which determines where the vertices in a 3D model should go, and a “fragment” or “pixel” shader, which determines the color of the faces defined by those vertices. Both include special variables which allow communication with other shaders and with the wrapper code, which defines and packages the shaders, and sends them to the GPU for processing.
Three.js shaders mirror this setup in a simplified way, including vertex and fragment shader code, special variables, and wrapper code. And as many shaders in three.js share functionality, they are mostly assembled from common pieces of code, which the three.js developers call “chunks” – these are code ingredients, which can be used in any recipe.
Here’s a link to the shader definitions in the three.js library, which shows how it assembles the shaders from chunks. The first shader so defined is named “basic”, followed our old friends “lambert” and “phong“.
If you’re as caffeinated as I am right now, you may notice in that file some extra lines in amongst the chunk references: most three.js shaders include some amount of unique custom code. And you remember my excellent automotive analogy earlier? This is the engine trouble: not all chunks are compatible with each other. At the time I wrote my demos, at least one of the default three.js shaders was built almost entirely from custom code which was difficult to integrate.
All this to say: it’s still a bit hairy for the novice, but there are stirrings of order in the chaos.
Speaking of which: we now turn, at long last, to my demo code – but in the abstract. (Gritty details are available in the source of the heightmap demos themselves.)
As mentioned before, I wanted to displace a mesh with a heightmap. Displacement is included as a feature in a three.js shader called “normalmap,” named for its ability to support normal maps. These are textures that can modify a face’s “normal”, which is the direction it appears to point; this handy technique can add apparent detail without adding more vertices.
However, the normalmap shader doesn’t include built-in specular shading, which I wanted for its ability to highlight small details. (Specular shading is included in a number of other shaders, including the “phong” shader, as seen above.)
The normalmap shader’s displacement ability was also missing a few other features I had expected: for instance, though it successfully displaced vertices, the displacement was not factored into the normal calculation. So though the faces were now in new orientations, they were reflecting light as though they hadn’t moved. This is because in the normalmap shader, the normals are assumed to come from a “normal map” texture passed in separately. Additionally, there was no mechanism in three.js to update normals once the vertices had been displaced. This is all stuff which a professional 3D application will handle for you, but the current incarnation of three.js does not.
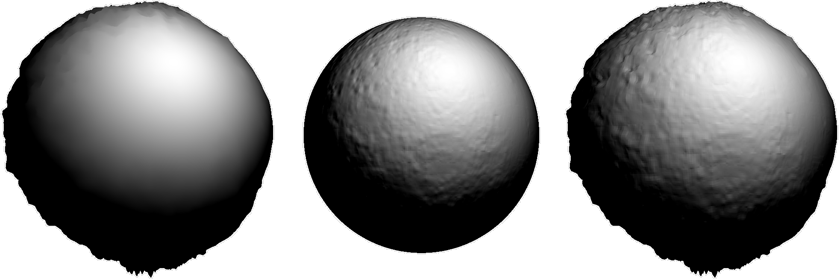
(Left to right: a displacement map taken from a heightmap of the moon’s surface, without adjusted normals; a normal map with no displacement; displacement and adjusted normals combined. Try the normals demo to toggle these features, and see the relationship between them.)
To work around these problems, I decided to derive normals straight from the displacement map, a technique called “bump mapping.” To do this, I pulled in a chunk from the “phong” shader which does exactly that, and integrated it with my custom normalmap shader. So the final shader (as seen in this terrain demo) is a kind of normalmap-phong hybrid.
The rest of the code in the demos served to manipulate the heightmap itself through various means, particularly the “dilate” and “erode” morphological operations, and stackblur, for fast blurring of canvas images.
I wrapped it all up with a small interface using another simple library called dat.gui.
One might argue that terrain manipulation is a weirdly specific way to learn these techniques, and one would be right; but you’ve got to follow your kinks. These tools and techniques can certainly be used for more interesting explorations, visualizations, and interfaces. Still, it’s going to take a lot more work to navigate web 3D from “shiny trinket” to “productive member of society.” I live in hope.
(All the demos in this post are collected at https://github.com/meetar/threejs-shader-demos.)
This post was originally published at http://edgeca.se/journey-to-the-center-of-web3d/.